Hi, guys! So, I did it. I got the e.l.f Ultimate Blending Brush (here for $6). And… I love it. And we are all thinking the same thing…. dupe for RT Buffing Brush?! I say…. YES.
Barrel size is essentially the same size! They have a similar grip.
You can see here that the e.l.f brush is slightly fluffier.
So you can see here as well that although the barrel is the same size, the head of the barrel is slightly larger to account for more hairs.
Once again, you can see the difference in fluffiness.
A little more dense.
Overall, I think these are pretty interchangeable. The Ultimate Blending Brush is actually quite a bit softer than the Buffing Brush.
Honestly though, I probably recommend spending the extra $10 for the Real Techniques Core Collection because you also get the RT Contour Brush. I don’t use the Pointed Foundation brush much, but lately I’ve been using it to apply really diluted highlighters that I need to pack on for impact.
So, either way you go, you should purchase! I’m so happy I’ve got both, and will be using both.
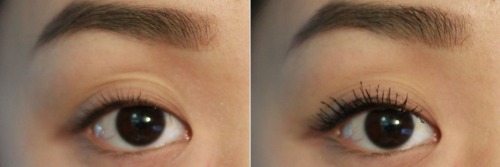
Most people of Asian decent have naturally long, but straight lashes, which is the same case for me. Here, they are curled. If not curled, I’m not sure you would be able to tell I have lashes at all. I am completely void of makeup with the exception of brows (which are my “lazy girl” brows, more on that here).
As for the mascaras, I recently picked up two new mascaras, the L’Oreal Telescopic Carbon Black Mascara (here for $11, found at my local Target for $8) and the CoverGirl LashBlast Volume Waterproof Mascara (here for $8, found at my local Target for $7). Both have been renowned as “the best mascara out there” by some of my favorite beauty bloggers, so I figure, why not? I’ll try them both out.
Sorry for the water rings on the desk - ick. I decided to try Starbuck’s “Orange Valencia” because a bunch of the girls I work with drink it and tell me it’s amazing and good for you…. Lemme tell ya. Much like most of the things that are good for you, it doesn’t taste very good. Unless you’re keen on sour things, you can skip this one. It was very pretty looking, though! Anyway…..
When it comes to packaging, I definitely prefer the packaging for the Telescopic, because it’s much slimmer, and the wand is easier to hold. That doesn’t mean I don’t like the LashBlast, but it’s definitely chunky, tube-wise, and the wand is more difficult to hold. Nothing that’ll keep me from using it though, it’s just a little weird for storage purposes.
I chose the Telescopic Carbon Black versus the original Telescopic and the Shocking Extensions mascara because I had a lot of luck with the L’Oreal Voluminous Carbon Black Mascara (here for $7, if you want a review, let me know!), and Carli Bybel at the Beauty Bybel raves about it constantly, and her lashes always look AMAZING, with or without falsies. I hadn’t gotten the waterproof version of the Voluminous mascara, and it holds a curl very well, so I figured I didn’t need the waterproof version. The waterproof version wasn’t available at the Target I was at, and I’m lazy.
As for the wand, I am always a fan of the chunky natural bristled hairs, so this was a change for me. The wand is long and thin, with plastic bristles. There are four sets of bristles, each line spread relatively far apart. The wand bends, which I usually hate. I have to say, I do actually like the wand. You can get directly into your lashes without too much fallout on your lid.
As for the actual mascara, I…. can I say I hated it? I hated it. I definitely hated it. The formula for this mascara is a very wet one, and I’m not seeing a lot of length. I can see a bit more volume than what you can see in this picture, which is not surprising because of the “carbon black”. Because of the wet formula, my lashes wilted big time. They were pretty much straight by the time the mascara set, and the ends of my lashes already had clumps, despite the plastic bristles and despite only doing one coat. And it’s not even goopy! Carli must have really naturally curly lashes that look deceivingly straight on camera. The only pro I can think of is that there was no fallout on my lid. I’m a bit of a n00b with application, so I’m shocked there was little to nothing to wipe off. Maybe I’ll try the waterproof original formula and see if it’s any better, or try leaving it out to dry a bit, like I’ve done to my Jordana Best Extreme Volumizing mascara (here for $3 - if you want a review, let me know!). I’m extremely disappointed in this one.
I chose the LashBlast Volume versus the original LashBlast because I am always looking for more volume. I went waterproof on this one because I’ve gotten non-waterproof mascaras or water-resistant mascaras by CoverGirl before, and I’ve been unhappy with them. This wasn’t a direct recommendation, but Karima McKimmie from Shameless Fripperies recommeded the Max Factor False Lash Effect Mascara (here for $12, not available in the US) in one of her tutorials. As far as I’ve seen and read about, Max Factor is supposed to be the sister company to CoverGirl, with a plethora of similar products, this being the LashBlast equivalent. The LashBlast looks like they took the False Lash Effect and made the tube orange and changed the print. So. Identical. Anyway, I have bought almost every item Karima has recommended from the drugstore (and one high-end product), and have been happy with ALL of them. She is, by far, my absolute FAVORITE beauty blogger, and I’m obsessed. I take her word for anything beauty related.
The wand is chunky like I like, but seems to have plastic bristles. The only other CoverGirl mascara I’ve liked so far has been their Clump Crusher (herefor $8), which, come to find, is part of the LashBlast line! I bought this on recommendation by Sharon Farrell of Sharon the Makeup Artist (who coincedentally also recommended the False Last Effect). The Clump Crusher is great, but I don’t use it often because the plastic bristles actually hurt my lid on application, which is a little weird, but it does. The bristles on the LashBlast are quite soft, though still separating!
I friggin LOVE this mascara. Lengthening, volumizing, and separating. Like, possibly my new favorite mascara. It even holds my curl! We might owe this to the waterproof-ness. The only con: fallout. It’s not the typical fallout, where the product is flakey and I have to swipe it off my cheek, but I tried my *best* to not touch my lid, and the product still transferred. A lot. Again, I’m such a n00b at applying makeup, so this is not a major drawback. I am perfectly fine using a business card behind the lashes on application, a la Michelle Phan.
So as a quick comparison:
I hope you enjoyed this post! I’m going to review the Physician’s Formula Eye Booster Instant Lash Extension Kit (here for $15) next! If you’ve got any questions or want to request a review, please message me! I’d love some feedback as well.
So I know I said I was on a no-makeup buy….. but technically, I didn’t buy makeup! Just makeup tools. ;)
Today, I bought two of the new e.l.f. Studio Brushes, the Mineral Powder Brush (at Walmart for $3) and the Small Tapered Brush (at Walmart for $3). If you look at my makeup collection, you’ll know that I LOVE the e.l.f.Studio line. I almost shop exclusively in their Studio line because I’ve always had rotten luck with their Essential line, both online and in store. I haven’t been disappointed by any e.l.f.Studio product as of yet! Which is really awesome and exciting for my wallet.
So here, we have the packaging:
It’s your typical e.l.f.packaging, and the brushes both come with slips/brush guards (which I don’t use and throw away immediately after opening).
As for the brushes, they’re beautiful!
They’re extremely soft! Softer than some of the other e.l.f. studio brushes that I’ve purchased before. They’re as soft as, say, the It cosmetics brushes, which are pretty damn soft.
Although the Mineral Powder brush seems to be more dense than the Small Tapered brush, the Mineral Powder is much fluffier and allows for a more diffused application, whereas the Small Tapered brush is surprisingly dense, and allows for a much more direct application given its size.
The Mineral Powder brush seems like a smaller version of the e.l.f. Complexion brush (here for $3), and a bigger version of the e.l.f. Flawless Concealer brush (here for $3). Both of which I actually own, but are not pictured because of how absolutely filthy they are (sorry!). I’ve been using this to apply really pigmented blushes, i.e. the Wet N Wild Color Icon blushes or the NYX HD blushes. Although small and seemingly directional, this brush has been surprising amazing at blending out harsh application.
The Small Tapered Brush is a dupe for the Real Techniques Setting Brush (here for $8). It is slightly flatter when turned onto its side, as shown in the image above, so it’s conducive for patting on powders. I’ve been using mine for setting my under-eye concealer as well as for applying highlighter. So far, so good!
The Small Tapered seems to actually be a small version of the e.l.f. Blush brush:
The only difference between these brushes, besides size, is the softness of the Small Tapered brush, as far as I can tell. You can see that I really abuse the blush brush because of how faded the hairs are - I wash my brushes a LOT. I just really enjoy this brush and am considering buying another one!
So overall… I LOVE these brushes. I would definitely re-buy. If you are just getting into makeup, I suggest you purchase these brushes because they’re inexpensive and are fantastic. I’m thinking about ordering the e.l.f. Studio Ultimate Blending brush (here for $6), the e.l.f. Studio Contouring brush (here for $6), and the e.l.f. Studio Blending brush (here for $3).
Thought I’d do my very first review post! I recently purchased some new NYX brow products from Ulta. I’ve been OBSESSED with brows for the last month or so, and I’ve been experimenting with a few different techniques.
What I look for in a brow product is something with an ashy undertone that is long-lasting in Texas heat, but doesn’t necessarily need to be water-proof.
First up is the NYX Eyebrow Marker, found here for $10:
This one I’ve actually had for about six months. There are only two shades, medium and deep. Since the medium was almost red it was so warm, I chose the deep shade.
Although this is the cooler-toned shade, it is still warm as HECK, and still leans red. The nib is pretty fat, but has a thin tip for definition. It doesn’t claim to be water-proof, which is great because it definitely isn’t. I feel that, when the product sets, it is extremely long lasting and does set to a shade darker, but as SOON as water hits my brow, it’s gone. I do find that I can get a little moist/oily/sweaty (it’s Texas, y’all), and the brows still stay in place, so long as I don’t touch them.
So despite my bloodshot eyes and smeared 11 p.m. wing, you can see that the product is quite warm, but does do well in defining my brows.
I used this product for a good two months, so I obviously loved it! I was okay with the warmer tone when I first started using this product because I had just dyed my hair a warm, honey-toned blonde. The one little tube has lasted me all this time. Now that my roots have grown out and my natural dark brown-black hair frames my face, I don’t reach for this product as much. For $10, it’s worth the try, but I don’t recommend this pen for anyone any darker in skin tone than I am, or with dark hair. It could end up looking a lot like a brown Sharpie.
Second product I have been trying is the NYX Micro Brow Pencil, found herefor $10:
This pencil comes in eight shades online, but only five at the Ulta that I purchased it at. The only three shades that I felt were even close to what I was looking for were Taupe, Ash Brown, and Espresso. They did not have Taupe, but going off of the swatches done by BeautyBuzzHub, it looked a bit too light:
(credit for this picture goes to Sarah of BeautyBuzzHub - you’re the bomb!)
I got to actually swatch the Ash Brown, the Espresso, and the Black in the store. I found that Espresso was still too warm and that Black was way too dark for my coloring. So I chose Ash Brown!
They really mean it when they say micro brow, too! The pencil is tiny, but very firm, so there’s no breakage if you go ham on your brows, and no smudging because the kohl isn’t soft. The product also comes with a teeny, tiny spoolie. I actually find that, for my brows, it’s a little too rough, so I end up brushing away all the product that I’ve applied. I purchase my own Disposable Mascara Wands from E.L.F. ($3), only because they’re cheap, hygienic, and they’re soft, so they don’t erase all the hard work I’ve done on my brows.
I really love this product because of how buildable it is - here I’ve tried to show how you can build the product. The first picture is my naked brow, the second picture I’ve done a really simple, “natural” brow to fill in big holes, and the third is a “full” brow.
Overall, I’ve been really loving this product. It holds up really well in moist situations - like when there is light rain or humidity in the air. Because the kohl is waxier, it tends to be a little more water-resistant than the other products I’ve featured. The shade is a little off here, and it seems a lot warmer than it looks in person. It gives me a really natural brow, which is an awesome alternative to the concealer carved brow.
The third and final product I tried was the NYX Tinted Brow Mascara, foundhere for $7:
This product comes in five shades, four of which were at my local Ulta. I tried the Brunette, Espresso, and Black shades. The Black shade was absolutely too dark, almost like regular mascara. The Espresso shade was, as the micro pencil, much too warm. I opted for the Brunette shade, which seems light in the package, but swatches much darker.
This is a difficult product to use in that I can’t get a very precise brow. This is a product I typically use in combination with the micro brow pencil, or when I use an eyeshadow to fill in my brows. One thing I have to say…. this stuff SMELLS. Like. SMELLS. It reminds me of fresh paint, but really cheap, old paint that’s been sitting in a garage for a couple years. But, because I like the product, I deal with the smell on application because, once set, the brows don’t budge and the smell goes away. Again, though, this product is not water proof, and will literally be erased if water touches your brow.
The precision and edginess shown here are from wiping the excess product off my skin with my finger; otherwise my brows would look like a two year old sketched them on with a skinny crayola marker. This product is SUPER pigmented and does the job in two to three swipes. I was really happy with the product b/c of how easy it was - I have dubbed this application process my “lazy girl brow”. Word of warning: It definitely is the least natural if not carefully applied because of how pigmented it is.
So that’s it folks! As a comparison, I like all three brow products! Not a big surprise because I do research like a lunatic before buying anything, no matter how cheap. The picture above shows a side/side comparison of the three products I’ve mentioned, starting from the tinted brow mascara on the left to the eyebrow marker on the right. It’s a bit of an easier way to compare precision, color, and application.
Other brow products I wanted to try from NYX are the Tame & Frame Brow Pomade (Here for $7) and the Eyebrow Gel (Here for $7). They are apparently dupes for the Anastasia Dipbrow Pomade (Here for $18) and theMake Up Forever Aqua Brow (Here for $20). A brow product that I did try from NYX which I HATED and almost immediately gave away was the Auto Eyebrow Pencil (Here for $5). None of the shades worked, the consistency was too waxy in that the application was patchy, and it was not long-wearing at ALL. Even though it is only $5, that is absolutely a product that I would skip.
If you guys have any recommendations for products I should try, for brows or not, let me know! Leave me a message so we can chat! :)
Warning for the light-hearted: This is definitely a TL;DR post; it is incredibly LONG. You might need to lie down after this one.
I’ve tried SO many foundations and concealers from the drugstore, and none from higher-end brands. Many of the products I use I’ve researched endlessly about, and several have been famous dupes for some of the higher-end ones.
My base routine goes something like this: (1) Moisturize, (2) Prime, (3) Foundation, (4) Concealer, (5) Powder. Sometimes I do my concealer before my foundation. Sometimes I don’t prime, conceal, or powder at all. Sometimes I also add cream contour/highlight and blush before powdering as well, but that’ll be explored in a later blog post.
(1) Moisturize/(2) Prime:
I used to be a HUGE Clinique fan; I used their yellow Dramatically Different Moisturizing Lotion (found here for $26), as well as their Moisture Surge Extended Thirst Relief (found here for $52), which are fantastic moisturizers. These were the products I used to use when I still lived at home and my mom bought all of my makeup. Now that I’m moved out and am relying on my own budget, I’ve had to explore other options.
Firstly, I now use the Olay Complete All Day Moisturizer with Sunscreen Broad Spectrum SPF 15 for combination/oily skin (found here for $10), which is a dupe for the DDML from Clinique. Both are creamy and very emollient, and are opaque in color. I usually reserve both for the autumn and for winter, when my skin is dry because of the emollience. I find that, when using the Olay CADM, oil does form on my T-zone, specifically my forehead, after about six hours. But for over half the cost, I’ll happily blot and powder. Because the Olay also has SPF and the Clinique does not, you also get the lovely stinging sensation in your eye if you get ANY trace of the SPF in, which does not happen with the Clinique DDML. Just an FYI for all the contact wearers out there - it’s not fun when this happens. I chose the combo/oily skin option because the moisturizer is so emollient - opting for this style can help reduce the oil that accumulates.
For mostly every day, I now use the Garnier USA Moisture Rescue Gel Cream for dry skin (found here for $6). This is a dupe for the Clinique MS. Both have the exact same effect on my skin, and leave a dry, satin finish. These moisturizers are NOT emollient whatsoever, and I find I can use them under my eyes without fearing the SPF sting. For almost a ninth of the price, this product is a complete dupe and I won’t be going back to the Moisture Surge.
The only primer I use is the Maybelline Baby Skin Instant Pore Eraser(found here for $7). I reserve this primer for those days when my skin just seems bumpy and gross, and I want to reduce any pores. I apply it only in places where I feel I need to, and not all over the face. It works! It really does instantly erase pores. A dupe is the E.L.F. Mineral Infused Primer in clear (found here for $6), which I have tried and finished. I loved the pump, but prefer the Baby Skin because of the squeezable tube - it’s your own preferences. I find that the E.L.F. primer is not quite as instant, but has the same effect once the foundation is applied.
(3) Foundation:
While I’ve only worn foundation for about a year and a half, I have gone through so. Many. Drugstore. Foundations. And have thrown away SO MANY (sad face for my bank account). These are my favorites, and the only ones I’ll be buying, at least for a while. For foundation, I look for light/medium buildable coverage with a luminous, satin finish. Two of the foundations I own are luminous while the other two are more matte, though all have a satin finish.
The first is the L’Oreal True Match in the shade Nude Beige W3 (found herefor $11). This foundation is a universal favorite by beauty bloggers across the world. It was the first foundation I ever bought that I actually loved! I find that the best way to apply this foundation is with my fingers because it does dry and set pretty quickly, so the warmth of my skin helps elongate the application. This foundation doesn’t oxidize, and as a warning, you should go a shade darker than you would normally because the SPF does throw a white cast in flash photography. I’m okay with this shade because I use bronzer and I contour quite a bit, so the foundation actually ends up looking like a highlight. I have to mention though - for dryer skin types, like myself - this foundation does set to an almost powdery finish, which I personally don’t like. I reserve this base for hotter, more humid days.
The second is a sister foundation to the first, the L’Oreal True Match Lumi in the same shade, Nude Beige W3 (found here for $13).While slightly more expensive, I will shell out the extra $2 ANY day, because this is my absolute favorite foundation - my holy grail. I LOVE the finish of this base - very luminous without looking greasy, and my skin feels like skin once it has set. Although it is the same shade, the Lumi version is ever so slightly darker, and although it does have SPF, it does not throw a white cast with flash! It also comes with a PUMP, which is so much more hygenic and convenient. This was the last foundation I’ve purchased and is my daily foundation.
A third option is the Maybelline Fit Me Dewy + Smooth in the shade 220 Natural Beige for normal to dry skin (found here for $8). They did change their packaging, and now the 220 shade is now 120. While this foundation does have an SPF, it oxidizes like CRAZY. While I absolutely love the truly dewy and smooth finish, I can only use this foundation when my skin is at its driest. I tried it once on a warm, sunny day last fall and my face and parts of my neck ended up being two shades darker by 2 p.m. Not attractive at all. I’ve been meaning to try the sister Matte + Poreless version because Kathleen Lights uses it and she has dry skin like me, but I haven’t been willing to shell out any cash for foundation when I’ve already fallen for the True Match Lumi. Love the one you’re with, right?!
The last foundation I’m going to mention is the Revlon Colorstay in the shade 240 Medium Beige for combination/oily skin (found here for $13). While I love this foundation, I want to try it in its normal/dry skin counterpart. Much like the True Match original, it doesn’t oxidize and even without an SPF, it throws a white cast in flash photography. It also sets with a powdery finish. As for the 24 hour claim, I don’t usually wear makeup on my face for longer than 12 hours. From what I can see, all the foundations I’ve mentioned have lasted the full amount of time I’ve worn them. This is another foundation I find is better applied with fingers, and one that I reserve for hotter, more humid days. I think I also need to reassess the shade and go for two shades darker.
(4) Concealer:
Because there are so many, I’m going to try to only dip into the details of these concealers. I do rotate between all of these, though I do prefer some over others.
The only concealer I use for spot concealing is the one on the far left. It is the Avon Ideal Flawless Concealer Stick in the shade R03 792-006 Neutral(found here for $7). This is because, much like the Laura Mercier Secret Camouflage, it is too thick and waxy to apply directly under the eyes without a mixing medium. It’s an oldie, but a goodie.
The two concealers I use to correct or neutralize are the Maybelline Instant Age Rewind Eraser Dark Spot Corrector in 225 Light/Medium (found herefor $10) and the CoverGirl TruBlend Fixstick Concealer in the shade Medium Light, or M-1,2,3,4 (found here for $9), the second to which I owe toShameless Fripperies - I have an inherent mistrust in CoverGirl products for some reason; they’ve never worked for me! The former I use to cancel any darkness under my eyes because it is salmon colored and has a thin but comfortable consistency, and the latter I use to neutralize any spots or darkness because it is emollient, waxy, and creamy and is a perfect shade match for my skin. I do want to try the Maybelline IARE Dark Circle Corrector for undereye concealing, but, again, LOVE THE ONE YOU’RE WITH, RIGHT?!
The four concealers I use for undereye brightening are the Maybelline Dream Lumi Touch Highlighting Concealer in Buff (found here for $8), theMaybelline Fit Me Concealer in 20 Sand (found here for $7), the CoverGirl TruBlend Fixstick Concealer in the shade Light, or L-5,6,7 (found here for $9), and the NYX HD Concealer Wand in CW 06 Glow (found here for $5). My favorite as of late has been the NYX, which has been labelled as a dupe for MAC’s Pro Longwear Concealer (found here for $20); it is extremely longlasting and pigmented and has a thin consistency which is ideal for blending. My least favorite as of late has been the Dream Lumi Touch, which has been labelled a dupe for the YSL Touche Éclat Radiance Concealer(found here for $42), simply because I feel that I might be allergic to one of the ingredients. Every time I use it, the finish and effect is perfect, but after 10 minutes, I get little lumps under my eye that creep me out, so I keep this concealer to highlight other parts of my face now. The Fit Me concealer and the TruBlend are fantastic as well, but both are very creamy and require almost instantaneous setting with a powder, as both crease like a mofo.
Finally, (5) Powder:
These two powders are my ride-or-dies. The first, the Maybelline Fit Me Pressed Powder in 220 Natural Beige (found here for $8) is my favorite because it is very lightweight, essentially translucent, and is ideal for setting the undereye. It has been labelled a dupe for the Laura Mercier Loose Setting Powder (found here for $37). The second, the Rimmel Stay Matte Pressed Powder in 20 Nude Beige (found here for $5), has a slightly higher coverage, and I almost feel like it can feel heavy when packing it on, which is something I don’t experience with the Fit Me powder. The Rimmel does stay matte for a much longer period than the Fit Me does, which is why I love using it for warmer weather.
Last but certainly not least, I did want to add this:
BRUSHES.
I won’t go into detail about the specifics, but I will mention what types of brushes I recommend using for certain products. You can absolutely do whatever - there are NO rules in makeup. I prefer to apply certain foundations with a flat paddle brush (the first brush in the right-hand picture) and then buff it in with a flat, dense, synthetic brush (the second and third in the right-hand picture). I like to pack on the powder under my eyes with a small, fluffy, domed brush for the shape (the third brush in the left-hand picture), and to set the affected portions of my face with a larger, fluffier brush (the second brush in the left-hand picture).
Once again, thank you if you made it down this far! You deserve a nap. Or a piece of cake. Either way, I appreciate you and send you virtual hugs and kisses.