Hello! I’m back for another review, this time on two Physician’s Formula products. The first is the Physician’s Formula Eye Booster Instant Lash Extension Kit (here for $15), and the second is the Physician’s Formula Powder Palette Mineral Glow Pearls in Light Bronze Pearl (here for $14).


I’ll admit… I’m cheap. I’m so cheap. So Physician’s Formula is not the first brand I browse at the drugstore, simply because I don’t want to be tempted. These things add up… But, I took one for the team. TWO for the team, actually. Here are my fndings, starting with the Eye Booster Instant Lash Extension Kit:


The mascara, step one, has a curved wand, which makes it easier to access the root of the lashes.


The extensions, step two, have a straight, short wand, which makes it easier to add the fibers to the tips of the lashes. I didn’t tap off the excess, so you can see the little tail of the fibers sticking out of the top of the wand here.

Next, we’ll talk about application:


Here’s  my naked eye, again, with nothing but brow product. This time, all I’ve used on the brows are the NYX Gel Liner and Smudger in Scarlette (here for $9), which, when used sparingly, is fantastic for the brows (and for lining and smudging). I’ve curled my eyelashes.


Step One: Adding a generous coat of mascara. The mascara does a good job of thickening and adding length to my lashes, though I find the formula to be quite sticky and a little messy. But overall, I could do this mascara alone. My lashes wilted ever so slightly.


Step Two: Add extensions. The video on the website recommended that you tap the excess product off the brush before touching it to your lashes. Even then, I noticed a bunch of fallout.


The fibers seemed to irritate my lash line a bit, but it wasn’t anything I couldn’t simply sweep away; I didn’t feel itchy. You can see the ONE stray lash in this picture…. It would not curl for the life of me.


Step Three: sealing the fibers in with another layer of mascara. I wasn’t overly satisfied with the result. From afar, the lashes looked full and voluminous, but not very long. Up close, you can see quite a bit of clumping. But I thought, WHY THE HELL NOT, let’s add another layer of each.


The same amount of fallout, and still the weird lash-line irritation.


I definitely noticed a little more length at this point, as well as more volume. If at all possible, I noticed more separation and, though still a little clumpy, the lashes were more uniform. I especially like the lashes from a further distance.
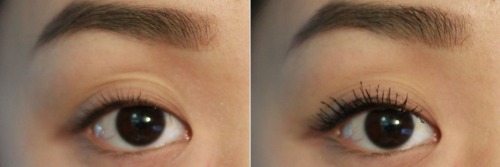
So, as a before and after:


Overall rating: 3/5. My lashes felt heavy the first five minutes, but after messing with the Mineral Glow Pearls, they felt normal. I don’t think I’ll use this mascara daily, because of the process, but I do really love the effect. I wear glasses most of the time, so this is a good one to amp up my lashes behind my myopic lenses to open my eyes up.
Next up is the Powder Palette Mineral Glow Pearls:


As for packaging, it’s beautiful. I love that the compact comes with a mirror and a brush (which is fantastic, btw). The product is quite firm in the pan, and has been molded in such a way that I know the “pearls” won’t crumple. I must be awfully rough with mineral product, because this Powder Palette is the first that I have managed to keep in tact for longer than 24 hours.
I chose the color Light Bronze Pearl because Emily Loke of emilyloke.com, who is my latest blogger obsession (of course on recommendation by Karima McKimmie, my all time favorite beauty blogger), raved about it in one of her Highlighter Chronicles posts, found here. She compared it to MAC’s Mineralize Skinfinish in Soft & Gentle, which I have swatched and lusted after for months. I, hearing of a drugstore dupe from a trusted source, immediately went to the store to purchase it. 


Here is my bare skin. No foundation, concealer, powder, nothing but my daily moisturizer. I have a bit of highlighter on my brow-bone, some brow product, and, of course, the Instant Lash Extension Kit. And excuse what looks like a bunch of blemishes… it’s freckle season.


Here is one light layer of the highlighter on my cheekbone. I wasn’t completely wowed by the effect, but it doesn’t picture as well on camera. I used a really delicate fan brush in fear that I would overapply, but it in turn created very little impact. I decided to add another layer, this time using the more dense brush provided.


It DEFINITELY made a difference. As Emily described, I did notice that it blurred my skin in a really lovely way. It was enough to make my skin shimmery without looking frosty, while still showing my natural skin through. I really loved the effect, and the dense brush absolutely allowed for more impact.
Is it a dupe for MAC’s Soft and Gentle? Unfortunately, from what glorious memories I have, no. Light Bronze Pearl has more definitive sparkles, versus the fine shimmer of Soft and Gentle. The overall effect on my arm is similar, though. It wouldn’t hurt to try it.


Here is the effect from the front. In retrospect, I should have really applied some undereye concealer, because LOOK AT DEM BAGS, but, eh, such is life. Overall, I rate this product a 4/5 - I have a few cream products that I have loved more than this product, and therefore cannot give it a full 5/5. The product did really WOW me, and I can’t wait to test it in conjunction with cream product to really cause some impact. I didn’t do an arm swatch because I can’t find my 55mm lens (!!!), and my arms are way too short for the 50mm lens. Trust me. I tried. The results were hilarious.
Thanks again for reading and making your way through an entire post! I know these are always so packed with rambles - there’s just so much I feel can’t be expressed with just pictures.
Xoxo, Kassy
Hello! It’s been a while since my last post! Thank you to those who have viewed my page and emailed  me! Please don't be shy to comment on my page - I would love to hear from you all and chat about beauty products! :)
Here are my four favorite drugstore contours thus far:


From left to right, we’ve got the Milani Even-Touch Powder Foundation in the color 06 Caramel (here for $9), the NYX Nude Mattes Eyeshadow in Bare It All (here for $5), theBalm Bahama Mama Bronzer (here for $20), and the NYX Hot Singles Eyeshadow in Happy Hour (here for $5).


In comparison, the Milani Even-Touch Powder Foundation in 06 Caramel seems downright orange, though when photographed individually, it appears to be a cooler toned brown, despite the red undertone. I reserve this powder for the warmer months, when I’m at my darkest. My skin-tone tends to lean more ashen the darker I get, so I like this powder because it also works as a bronzer to warm my face up. Bonus? No glitter, and a little added coverage. Application is smooth and the powder is buttery, and the product is extremely blendable. The only issue I would have is that it is not buildable. I seem to only be able to add one pigmented “layer”; when I try to add more, I veer into Oompa Loompa territory. 


This next contour might very well be the exact opposite of the Milani ETPF; it is an extremely cool-toned brown, leaning gray. It is the NYX Nude Mattes Eyeshadow in Bare It All. I reserve this for the extreme contour, where placement becomes direct and strategic. This eyeshadow does kick up a bit of product, but is absolutely pigmented, and will take forever to blend onto your cheekbones. Start slow, and build. Once blended, the product looks smooth and casts the most natural shadow because of the gray undertone.


This bronzer, the ellusive Bahama Mama, has been getting a LOT of hype on Youtube. I’m not sure if theBalm is a drugstore brand, but I decided to include it because I love it so much. It is the perfect bronzer - warm with a diffused application, and ashy and blendable with more direct application. For the slightly higher price tag, I believe this product is absolutely worth it, and I have yet to find the drugstore equivalent.


The last “contour” is the NYX Hot Singles eyeshadow in Happy Hour. A cool-toned brown, very blendable, and pigmented. This can be used any time of the year, for anything ranging from defined contours, to more diffused ones. Thisis probably my favorite drugstore contour - so much so that I own two of them. I have this crazy fear that all my favorite products will disappear, especially drugstore products, even if they’re popular, and even if they’re labeled as part of the permanent collection. I’m crazy like that. 
I hope you’ve enjoyed this post! Thank you SO much for reading!
Xoxo, Kassy
Hi, guys! So, I did it. I got the e.l.f Ultimate Blending Brush (here for $6). And… I love it. And we are all thinking the same thing…. dupe for RT Buffing Brush?! I say…. YES.


image


Barrel size is essentially the same size! They have a similar grip.


image


You can see here that the e.l.f brush is slightly fluffier.


image


So you can see here as well that although the barrel is the same size, the head of the barrel is slightly larger to account for more hairs.


image


Once again, you can see the difference in fluffiness.


image
image
image
image


A little more dense.


image


Overall, I think these are pretty interchangeable. The Ultimate Blending Brush is actually quite a bit softer than the Buffing Brush.

Honestly though, I probably recommend spending the extra $10 for the Real  Techniques Core Collection because you also get the RT Contour Brush. I don’t use the Pointed Foundation brush much, but lately I’ve been using it to apply really diluted highlighters that I need to pack on for impact.

So, either way you go, you should purchase! I’m so happy I’ve got both, and will be using both.

Thank you so much for reading!

Xoxo, Kassy

L’Oreal Telescopic Carbon Black Mascara VS. CoverGirl LashBlast Volume Mascara, Review

Let’s talk about my natural lashes:


Most people of Asian decent have naturally long, but straight lashes, which is the same case for me. Here, they are curled. If not curled, I’m not sure you would be able to tell I have lashes at all. I am completely void of makeup with the exception of brows (which are my “lazy girl” brows, more on that here).

As for the mascaras, I recently picked up two new mascaras, the L’Oreal Telescopic Carbon Black Mascara (here for $11, found at my local Target for $8) and the CoverGirl LashBlast Volume Waterproof Mascara (here for $8, found at my local Target for $7). Both have been renowned as “the best mascara out there” by some of my favorite beauty bloggers, so I figure, why not? I’ll try them both out.


Sorry for the water rings on the desk - ick. I decided to try Starbuck’s “Orange Valencia” because a bunch of the girls I work with drink it and tell me it’s amazing and good for you…. Lemme tell ya. Much like most of the things that are good for you, it doesn’t taste very good. Unless you’re keen on sour things, you can skip this one. It was very pretty looking, though! Anyway…..

When it comes to packaging, I definitely prefer the packaging for the Telescopic, because it’s much slimmer, and the wand is easier to hold. That doesn’t mean I don’t like the LashBlast, but it’s definitely chunky, tube-wise, and the wand is more difficult to hold. Nothing that’ll keep me from using it though, it’s just a little weird for storage purposes.


I chose the Telescopic Carbon Black versus the original Telescopic and the Shocking Extensions mascara because I had a lot of luck with the L’Oreal Voluminous Carbon Black Mascara (here for $7, if you want a review, let me know!), and Carli Bybel at the Beauty Bybel raves about it constantly, and her lashes always look AMAZING, with or without falsies. I hadn’t gotten the waterproof version of the Voluminous mascara, and it holds a curl very well, so I figured I didn’t need the waterproof version. The waterproof version wasn’t available at the Target I was at, and I’m lazy.

As for the wand, I am always a fan of the chunky natural bristled hairs, so this was a change for me. The wand is long and thin, with plastic bristles. There are four sets of bristles, each line spread relatively far apart. The wand bends, which I usually hate. I have to say, I do actually like the wand. You can get directly into your lashes without too much fallout on your lid.


As for the actual mascara, I…. can I say I hated it? I hated it. I definitely hated it. The formula for this mascara is a very wet one, and I’m not seeing a lot of length. I can see a bit more volume than what you can see in this picture, which is not surprising because of the “carbon black”. Because of the wet formula, my lashes wilted big time. They were pretty much straight by the time the mascara set, and the ends of my lashes already had clumps, despite the plastic bristles and despite only doing one coat. And it’s not even goopy! Carli must have really naturally curly lashes that look deceivingly straight on camera. The only pro I can think of is that there was no fallout on my lid. I’m a bit of a n00b with application, so I’m shocked there was little to nothing to wipe off. Maybe I’ll try the waterproof original formula and see if it’s any better, or try leaving it out to dry a bit, like I’ve done to my Jordana Best Extreme Volumizing mascara (here for $3 - if you want a review, let me know!). I’m extremely disappointed in this one.


I chose the LashBlast Volume versus the original LashBlast because I am always looking for more volume. I went waterproof on this one because I’ve gotten non-waterproof mascaras or water-resistant mascaras by CoverGirl before, and I’ve been unhappy with them. This wasn’t a direct recommendation, but Karima McKimmie from Shameless Fripperies recommeded the Max Factor False Lash Effect Mascara (here for $12, not available in the US) in one of her tutorials. As far as I’ve seen and read about, Max Factor is supposed to be the sister company to CoverGirl, with a plethora of similar products, this being the LashBlast equivalent. The LashBlast looks like they took the False Lash Effect and made the tube orange and changed the print. So. Identical. Anyway, I have bought almost every item Karima has recommended from the drugstore (and one high-end product), and have been happy with ALL of them. She is, by far, my absolute FAVORITE beauty blogger, and I’m obsessed. I take her word for anything beauty related.

The wand is chunky like I like, but seems to have plastic bristles. The only other CoverGirl mascara I’ve liked so far has been their Clump Crusher (herefor $8), which, come to find, is part of the LashBlast line! I bought this on recommendation by Sharon Farrell of Sharon the Makeup Artist (who coincedentally also recommended the False Last Effect). The Clump Crusher is great, but I don’t use it often because the plastic bristles actually hurt my lid on application, which is a little weird, but it does. The bristles on the LashBlast are quite soft, though still separating!


I friggin LOVE this mascara. Lengthening, volumizing, and separating. Like, possibly my new favorite mascara. It even holds my curl! We might owe this to the waterproof-ness. The only con: fallout. It’s not the typical fallout, where the product is flakey and I have to swipe it off my cheek, but I tried my *best* to not touch my lid, and the product still transferred. A lot. Again, I’m such a n00b at applying makeup, so this is not a major drawback. I am perfectly fine using a business card behind the lashes on application, a la Michelle Phan. 

So as a quick comparison:


I hope you enjoyed this post! I’m going to review the Physician’s Formula Eye Booster Instant Lash Extension Kit (here for $15) next! If you’ve got any questions or want to request a review, please message me! I’d love some feedback as well.

Xoxo, Kassy

New e.l.f Studio Brushes

So I know I said I was on a no-makeup buy….. but technically, I didn’t buy makeup! Just makeup tools. ;)

Today, I bought two of the new e.l.f. Studio Brushes, the Mineral Powder Brush (at Walmart for $3) and the Small Tapered Brush (at Walmart for $3). If you look at my makeup collection, you’ll know that I LOVE the e.l.f.Studio line. I almost shop exclusively in their Studio line because I’ve always had rotten luck with their Essential line, both online and in store. I haven’t been disappointed by any e.l.f.Studio product as of yet! Which is really awesome and exciting for my wallet.

So here, we have the packaging:
image
image

It’s your typical e.l.f.packaging, and the brushes both come with slips/brush guards (which I don’t use and throw away immediately after opening).

As for the brushes, they’re beautiful!

image

They’re extremely soft! Softer than some of the other e.l.f. studio brushes that I’ve purchased before. They’re as soft as, say, the It cosmetics brushes, which are pretty damn soft.

image
image

Although the Mineral Powder brush seems to be more dense than the Small Tapered brush, the Mineral Powder is much fluffier and allows for a more diffused application, whereas the Small Tapered brush is surprisingly dense, and allows for a much more direct application given its size.

image

The Mineral Powder brush seems like a smaller version of the e.l.f. Complexion brush (here for $3), and a bigger version of the e.l.f. Flawless Concealer brush (here for $3). Both of which I actually own, but are not pictured because of how absolutely filthy they are (sorry!). I’ve been using this to apply really pigmented blushes, i.e. the Wet N Wild Color Icon blushes or the NYX HD blushes. Although small and seemingly directional, this brush has been surprising amazing at blending out harsh application.

image

The Small Tapered Brush is a dupe for the Real Techniques Setting Brush (here for $8). It is slightly flatter when turned onto its side, as shown in the image above, so it’s conducive for patting on powders. I’ve been using mine for setting my under-eye concealer as well as for applying highlighter. So far, so good!

The Small Tapered seems to actually be a small version of the e.l.f. Blush brush:
image
image
image
image

The only difference between these brushes, besides size, is the softness of the Small Tapered brush, as far as I can tell. You can see that I really abuse the blush brush because of how faded the hairs are - I wash my brushes a LOT. I just really enjoy this brush and am considering buying another one!

So overall… I LOVE these brushes. I would definitely re-buy. If you are just getting into makeup, I suggest you purchase these brushes because they’re inexpensive and are fantastic. I’m thinking about ordering the e.l.f. Studio Ultimate Blending brush (here for $6), the e.l.f. Studio Contouring brush (here for $6), and the e.l.f. Studio Blending brush (here for $3).

Thank you so much for reading!

Xoxo, Kassy